Thursday, May 30, 2013

Crafty Organization Thursdays: Diving In

Welcome back to another addition of Scrapbook Organization Thursdays. I am glad to have you. Last week we discussed a few different ways to organize our to do projects, or works in progress. You can read all about that post HERE. Today I am doing something a little bit different. Since I am in the middle of a large studio re-organization, I am showing you a glimpse into my scrapbook studio while I am organizing it. I will be discussing what works, what does not work, and showing you some organizational systems in progress. I am putting all scrapbooking on hold for the next three days (GASP.) This is really hard for me, I craft just about everyday, but in the name of organization I am making the ultimate sacrifice. At least I can still edit photos.

Now let's start with some BEFORE photos shall we. Some of what you will see is already organized, in the process, or just a hot mess. I believe in keeping it real however, so here goes:

I will start with my east wall. This is my tall bookcase. The bookcase with the infamous Post-It Note Memory Jogger System. Yeah that is the one.


Here is the side of the bookcase with the infamous system.

 Next, continuing around the room you see my large craft island, a tall cube with kit bins inside, and my printer on top.


This is the large window over the island, on the east side of the house. I have the curtain rod hung, but no curtains up. That is on the to do list.


Right next to my craft island is this cart. I love it. I purchased this at World Market a few months ago and it is very, very helpful. I love that it is a similar height to my craft table. It needs better organizing so that it can be more efficient, but I use the top two shelves almost everyday. You also see four Jetmax storage cubes in this picture. Did you notice that most of the paper is on the floor, but hardly any is in the cubes? Yeah, not working so well. Also the top is cluttered. Too many office supplies on top and paint should not be kept there. (See images below.)


Now onto the south wall. I loved "the idea of" these cube storage units by Craftmaid and purchased at Target. It is actually 2- 9 cube units, but the problem was that the in inside of each cube measures approximately 10" x 10" x10" and I needed something that was at least 15" x 15" x 15" for all of my albums and Scrapbook paper.


Rounding the room now is the west side. My computer desk and an extra table set up to organize things on. Yup, hot mess for sure.


 Another shot of my hot mess. Loving the piles on the floor=NOT!


 There is no north wall really, that is my entry way. Yup you guessed it. My scrapbook room is in my "intended dining room," but that is obviously not what we are using it for. Our kitchen is fairly large and can easily accommodate an 8-person table. With all of our family in another state, it makes more sense to use this room for crafting instead of a walk-by dining room, (the room you never use, but looks nice, and collects dust.)

So now that you have an idea for how my room is laid out lets get into the nitty-gritty shall we.

What works:
  • I love my craft Island. Seriously in love with that thing. It was purchased at a local shop in my small town. The owner's father made it out of reclaimed pine that was then burned and stained. I got a great deal, so basically it is just my most favorite furniture purchase ever.
  • I love that I have such large windows in this space, tons of natural light, and I even get many visitors to our bird feeder hanging just outside.
  • I love my computer, computer desk, and office chair. I have a matching stool for the craft table it is just not pictured. The chairs are very comfortable and I like the pattern a lot.
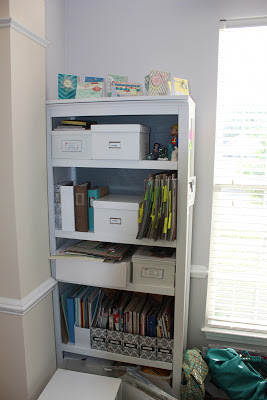
  • White storage shelf on wall. It holds my mists, embossing powder, glitter ribbons, and a little of my wood veneer stash. I love this shelf. (see close-up below.) This is organized well.

What Is Not Working:
  • There is a hot mess in that back corner: 
  • Papers on the floor and not in the cubes.
  • Cart needs to be better utilized to maximize storage. Need to finish organizing Project Life stuff on this cart.
  •  Power cord is sticking out like a sore thumb. I need to hide this better. 
  • The cube bookcases are not the right size. I need larger storage pieces for paper and scrapbooks.
  • Clear off my desk, why am I eating Pringles? Bad Toni.
  • The top of my white cubes in covered in office supplies and miscellaneous things that need a home.
  • There is no art work on my walls. I have art, posters, and what not, but they are not hung.
  • I have yet to make curtains or hang them. I have the fabric, just has not happened yet.
  • The extra folding table greeting guests when they enter my house. Yup, it has to go, like yesterday. That will be cleared off, put away, and it is never coming back in here.
  • Although I love my hanging ceiling light, it hangs too low, and I hit my head on it. Kind of annoying (even though it doesn't hurt.)
What I have accomplished so far:

Since I wrote this post on Tuesday, I have cleared out a lot of my room, touched up paint, cleaned most everything left in the space, my hubby raised my ceiling light for me, and we brought in a new, larger storage piece to replace my two smaller cube bookcases that were not working.

This large storage piece started as a sketch that I drew up over a month ago:


Which my husband then built and made my scrapbook storage dream come true. He is the best and quite the handy guy to have around. He is a saint I tell you. We were able to make this very large bookcase for just over $100, so not the cheapest bookcase ever, but a great bang for your buck, it is solid wood, and it is customized to my needs. Well worth the saving up for.


This bookcase was then painted (by me) last week and brought into my space (with hubby's help on Wednesday.) This is one very large bookcase. It measures 8 feet long x 16 inches deep x 42 inches high. It is a beast! Notice that the light is now raised, (thanks babe, love you.)


So that is where I am right now. I will be working on my studio all-day Thursday and Friday. I am determined to get it at least 80% done by the time the kids get home from school Friday afternoon. I will continue to work on this space all next week and share some results with you soon. There is still a lot to do, but this is the fun part. I cannot wait to hang pictures and really personalize this space. We bought this house in December and I am just ready to have my pics out of boxes and up on the wall already.

What Can You Take Away From This:
  • I think it is really important to critically organize your crafting space and take note of what is and what is not working. 
  • Do not buy furniture if it does not work for all of your crafting needs. It is better to save up and get what will work. Or even save up and perhaps find someone handy to build it for you or possibly even hire someone, It might be worth it in the long run if you can pinch your pennies. I lived and learned on that one and ended up wasting money on two smaller bookcases that just did not work for my needs. I did get one with a gift card given to me, but still, no one likes to waste money. Luckily, we are having a garage sale early next month and I plan on selling those babies and recouping my loss. 
  • Do not under-utilize your existing storage. If you have empty storage units that work and stuff on your floor, then it is time to organize and get it off the floor!
  • Clear off your desk everyday (I am usually good at this, but have not been lately. ) I like a VERY neat computer/ work station with minimal clutter on top.
  • Give yourself a pat on the back for what is working: I like the overall organization of my narrow bookcase, love my craft table, my white shelf, and I did a great job picking out my desk and chairs. I took my time with those. Really thought about it and measured a lot.
  • Take your time shopping for what is right (that is after you measure, predetermine your budget, and draw out a space plan.) Yeah, I did that too, but sadly did not keep it. 
I will be back soon with some pictures of my studio and some tips for organizing. Hopefully, I will also have time to mess up my studio and create some fun paper goodies to share earlier next week as well.

I hope to see you back here. Thank you so much for stopping by. If you have any questions, please do not hesitate to ask below.

Happy Scrappin' (er Organizing)

xoxox

Toni
Wednesday, May 29, 2013

Layout Share: "Thirteen"

I am really loving working with the May Studio Calico Kit Planetarium. As of Tuesday, May 28th at 10pm EST, this scrapbook kit is still available HERE. I love the combination of navy, yellow, pink, and coral in this kit. It just seems to work so beautifully with spring and pool photos this month. This is my second layout using the Planetarium Kit, you can find my first layout using this kit HERE. This layout came together relatively quickly (about 2 hours, and I had a lot of fun misting and using a bunch of different stamp sets. I love the subtle layers you get with stamping and throwing mist around is always my idea of a good time. I also included a letter to my son in a glassine envelope.  To use this bit of sentimental memorabilia on this particular layout, I just copied and resized Elliot's birthday letter from this blog post. I then printed it onto 8.5 x 11 inches and cut it down using a paper trimmer so that it would fit perfectly into the glassine envelope. I love using envelopes and pockets behind larger layers and having a pull-out journaling element. It is a great way to still get your story in without sacrificing design if you have a lot of writing to include. I highly recommend this technique.

Now for the layout:


Supplies Used:
Thank you so much for stopping by today, I appreciate you being here. I will be back tomorrow with a new Scrapbook Organization Thursday post showing some photographs of my studio in progress. Friday I will be back to share some more scrappy goodness. If you have any questions, please do not hesitate to ask, I would love to help. Until next time,

Happy Scrappin'

xoxox

Toni

Tuesday, May 28, 2013

Project Life 2013: Weeks 19 & 20, May 6th- May 19th

I spent a couple hours on Sunday quickly finishing up two weeks of Project Life. At this point I had my memorabilia and approximately 80% of the photos for both weeks already printed. Editing, saving, and printing the remainder of the photos at home went relatively quickly, probably 20 minutes or so. Compiling the pages went very smoothly as well since I used items largely from the Studio Calico Planetarium Project Life Kit for week 19 and the Project Life Jade core kit for week 20. I find that when I want to finish a Project Life spread or two in a limited amount of time that using a kit really speeds up the process. Another option is to pre-determine your supplies and just stick with what you pulled out. I addition to the two kits above, I  also used a few stamp pads and about 5 different sets of stamps, that needed some love, a roller date stamp, my tiny attacher, a few letter sticker sheets, pen, scissors, adhesive, and some purple WE R Memory Keeper washi tape.  Just stick with what you pulled out, put it down, breathe deeply (if needed) and move on. It's about Memory Keeping, NOT, I repeat NOT having perfect Project Life pages.

Another tip that has saved me time and that might be helpful is to edit photos and print them out during; editing ahead of time is the biggest time saver for me by far. My least favorite part is always photo editing, I find if I spend 10 to a max of 20 minutes a day editing for Project Life, my blog, or for scrapbook pages, it goes so much quicker and it is not as much of a chore for me. Sometimes I have to do more, but then I divide it into a couple different photo editing sessions in a day. I just cannot make myself sit and edit for more than 20 minutes. It is time to share some Project Life, let's start shall we?

Week 19 Full Layout:


Left Side:


Left Side Close-Up:


Right Side:


Right Side Close-Up:


Week 20 Full Layout:


Left Side:


Left Side Close-Up:


Right Side:


Right Side Close-Up:


Let's talk photo editing? Are you fans? I use Photoshop Elements? What about y'all? My best tip is to do a little everyday, or at least twice a week. I find that if I let it build up to only once a week or longer, it takes for-ever and I have a tendency to put it off even longer. Any photo editing tips you would like to share? I would love to hear from you. If you have any questions about products used, or my Project Life process please do not hesitate to ask, I love to help my scrappy friends. 

I will be back again later this week for another layout share, a Scrapbook Organization Thursday blog post with some glimpses into my work in progress Scrapbook Studio, and other scrappy or crafty goodness. Have a great Tuesday and until next time, 

Happy Scrappin'

xoxox

Toni

Sunday, May 26, 2013

Layout Share: "At the Pool"

For today's layout, I used the June Paper Bakery Scrapbook Kit entitled, Glitz Roadshow. This kit is full of scrappy goodness from Crate Paper Maggie Holmes, Studio Calico, and Lily Bee (just to name a few of my favorites.) It also includes a large variety of embellishments as well as a complete package of Crate Paper DIY Ephemera and Crate Paper DIY Photo Overlays. If you think you might be interested in this fabulous kit, as of 9pm EST on May 26, 2013, there are still some available. This is my second month subscribing to Paper Bakery and I am impressed with the great variety of new scrappy products in the kits, as well as the outstanding customer service.

I received the kit on Saturday and loved it so much that I started and completed this layout the same day. Don't you just love it when you get some new scrapbook products and are so inspired that you tear into them right away? That is how it was with this kit. I am completely in love with the DIY photo overlay set by Crate Paper and the variety of papers in this kit, so much so that I knew instantly that I wanted to arrange everything in a grid pattern. This is what I came up with.


Supplies Used:

Thank you for stopping by, I hope to see you here later this week for more scrappy goodness, two weeks of Project Life Layouts, and another Scrapbook Organization Thursday blog post. Until then, Happy Scrappin'

xoxox

Toni

Tuesday, May 21, 2013

Layout and Card Share: "Spring in Rolesville"

I love Lily Bee products! They have been one of my favorite go-to scrapbook companies for a long time. I love their small repeating paper patterns and they always come out with the best color combinations. Another thing I love about their designs is that it is very easy to coordinate many lines together. For this layout, I used products from 4 different lines (2 new lines and 2 older lines.) I am also really loving their letter stickers. So in love! Swoon!

Today I am sharing with you a layout I made using Lily Bee products and a sketch challenge over at the Lily Bee blog. You can find the sketch HERE. I chose the photos for this layout from a collection of floral photos taken in our neighborhood. I am just loving all of the bursts of spring color everywhere and the cute southern charm of the mailboxes. I love this time of year.

"Spring in Rolesville"


Next up are 4 cards creating using another sketch at the Lily Bee blog. You can find the sketch HERE.


Products Used for Layout:
  • Lily Bee papers: Persnickety line-Huffy, Handmade-Patchwork and Fat Quarter, Sweet Shoppe-Lemon Drop and Stationery Linen, 
  • Lily Bee Pinwheel-Letter Stickers
  • Lily Bee Handmade stickers
  • Flower punch-unknown
  • Assorted buttons
Thank you for stopping by today. I am in the midst of a big overall/ organization/ furniture arranging session going on in my Scrapbook Studio. It is kind of chaotic at this point, but regardless, I will be back tomorrow for Scrapbook Organization Thursday with some "before" and "in the process of" organizing shots. I will also expand on why I am switching some pieces up, what worked and what did not.

Happy Scrappin'

xoxox

Toni

Did I ever tell you that I had a layout up on the Lily Bee blog?

Yeah. That totally happened. Totally made my week. So much so, that it has felt surreal, so surreal that I forgot to mention it. Yup. It really happened. Still pinching myself on that one.

This is the layout that was featured on 5/3/13 in the I spy Lily Bee products:


Here is the link to the blog post if you want to see my featured layout HERE.

Thank you again Lily Bee, what an honor.

xoxox

Toni

Sunday, May 19, 2013

Scrapbook Circle: "My Favorite" Layouts and Cards

Happy Monday and Happy Victoria Day to my Canadian readers. Just a couple of weeks ago on National Scrapbook Day (May 4th, 2013, ) I was lucky enough to win a prize by following Scrapbook Circle on Instagram. They gifted my friend Taniesa Vlasak as well as myself with the May Scrapbook Kit "My Favorite." If you like what you see below and are interested, Scrapbook Circle still has some of these kits available. You can find out more about those HERE.

Taniesa did a great job using this kit and made a layout, a Project Life spread, and 4 cards. Here are a few images showing Taniesa's beautiful work.


Be sure to stop by Taniesa's blog thecraftypickle.com and see the rest of her beautiful creations. She did  a fabulous job using this kit, I adore her butterfly layout, but you will just have to take my word for it and check it out HERE.

"My Favorite" has been one of my favorite kits in a long time. Everything worked together so beautifully and I was so inspired to create. I loved the color combinations, the neutral alphabet, the mix of florals, new Lily Bee labels, and even Crate Paper/ Maggie Holmes bows to boot. I mean seriously, what's not to love about that? I managed to complete 4 layouts and 6 cards in less than 72 hours. *I was not asked by Scrapbook Circle to post about this kit, I am just giving my honest personal opinion about a scrapbook kit that I really enjoyed. I will definitely be ordering from them in the future.*

These are the Layouts I managed to create using this kit (if you click on the pictures the images are larger and clearer:)

"Hello Noelle"


"3"


"So You"


"Best Buds"


Cards:


Supplies Used:
  • Scrapbook Circle "My Favorite" Scrapbook Kit
  • Tim Holtz tiny attacher
  • Silhouette Cameo cuts of hello and hearts
  • Heidi Swapp Color Shine in Gold Lame
  • Studio Calico Mister Huey in Navy, Inky Black, and Seafoam
  • Heidi Swapp aqua ghost letters
  • White American Crafts cardstock
  • Studio Calico Kraft woodgrain cardstock
  • Scrap of blue cardstock
  • Studio Calico wood veneer stars
  • Paper Bakery I Heart Social Media and Totally 80's flair
  • Embroidery needle, white and green embroidery floss
  • Shipping tags ( 2 medium white tags and 1 light blue large tag)
  • Divine Twine-gold and cream
  • Jenni Bowlin tab and pinwheel punch
  • Paperclip-bird from Studio Calico
  • Martha Stewart adhesive doily, 2 butterfly punches, and 1 doily punch
  • Queen and Company Twinkle Glitter Glaze
  • American Crafts Neon embossing powder in red, pink, amber, orange, green, and purple
  • Versafine Ink in Onyx Black and Sepia
  • Bahama Blue ink by Memento
  • Studio Calico Heyday stamp set 
Thank you for stopping by today. If you have any questions, please comment below. I am always happy to help. Thank you also to Scrapbook Circle for gifting me with this lovely kit. I simply adore it and had such a great time creating with this beautiful collection of scrapbooking supplies.

xoxox

Toni